Transferring photos from your phone to your PC can be essential for various reasons, including creating backups, freeing up phone storage, or editing photos on a larger screen. There are several methods to accomplish this, each with its advantages. This guide will explore multiple ways to transfer photos from your phone to your PC, providing detailed steps, troubleshooting tips, and additional insights to ensure a smooth transfer process.
Why Transfer Photos from Phone to PC?
Before diving into the methods, let’s consider the reasons for transferring photos from your phone to your PC:
- Backup: Protect your photos from loss by creating backups on your PC.
- Storage Management: Free up space on your phone by transferring photos to your PC.
- Editing: Use more advanced photo-editing software available on your PC.
- Sharing and Printing: Easily share photos or print them using your PC.
Methods to Transfer Photos from Phone to PC
There are several methods to transfer photos from your phone to your PC, each with its own set of steps and benefits. Let’s explore the most common ones:
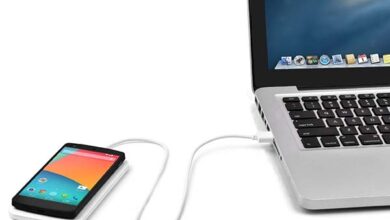
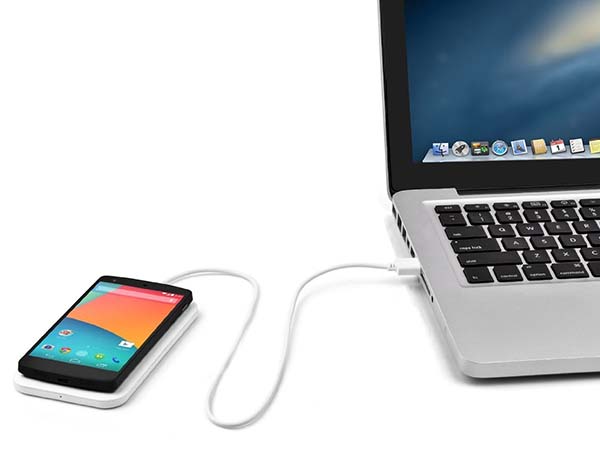
1. Using a USB Cable
Transferring photos using a USB cable is a straightforward and reliable method. Here’s how to do it:
For Android Phones:
- Connect Your Phone to the PC: Use a USB cable to connect your Android phone to your PC.
- Select File Transfer Mode: On your phone, select the “File Transfer” or “MTP” mode from the notification panel.
- Open File Explorer: On your PC, open File Explorer and navigate to your phone’s storage.
- Locate the Photos: Find the folder where your photos are stored on your phone.
- Copy and Paste: Copy the desired photos from your phone and paste them into a folder on your PC.
Troubleshooting Tips:
- Driver Issues: Ensure your phone drivers are up to date. If your PC doesn’t recognize your phone, reinstall the drivers.
- Cable Quality: Use a high-quality USB cable to avoid connection issues.
- Storage Permissions: Make sure you have granted the necessary permissions on your phone to allow file transfers.
For iPhones:
- Install iTunes: Ensure you have the latest version of iTunes installed on your PC.
- Connect Your iPhone to the PC: Use a USB cable to connect your iPhone to your PC.
- Trust the Computer: On your iPhone, you may be prompted to “Trust This Computer.” Select “Trust.”
- Open File Explorer: Open File Explorer on your PC and navigate to your iPhone under “This PC.”
- Locate the Photos: Open the “Internal Storage” folder and then the “DCIM” folder.
- Copy and Paste: Copy the desired photos and paste them into a folder on your PC.
Troubleshooting Tips:
- iTunes Updates: Ensure you have the latest version of iTunes to avoid compatibility issues.
- Photo Formats: Make sure the photos are in a compatible format (e.g., JPEG, PNG) for seamless transfer.
- Storage Space: Check that your PC has enough storage space for the photos you are transferring.
2. Using Cloud Services
Cloud services offer a convenient way to transfer photos wirelessly. Popular cloud storage services include Google Drive, Dropbox, and iCloud.
Google Drive:
- Upload Photos to Google Drive: On your phone, open Google Drive and upload the photos you want to transfer.
- Access Google Drive on PC: Open Google Drive on your PC and download the photos.
Detailed Steps:
- Upload: Open the Google Drive app on your phone, tap the “+” button, and select “Upload.”
- Organize: Create specific folders to keep your photos organized.
- Download: Select multiple photos at once to download in bulk on your PC.
Troubleshooting Tips:
- Internet Connection: Ensure a stable internet connection for both uploading and downloading.
- Storage Limits: Keep track of your Google Drive storage limit to avoid running out of space.
- Sync Issues: If photos aren’t syncing, try refreshing the app or logging out and back in.
Dropbox:
- Upload Photos to Dropbox: On your phone, open Dropbox and upload the photos.
- Access Dropbox on PC: Open Dropbox on your PC and download the photos.
Detailed Steps:
- Upload: Use the Dropbox app on your phone to upload your photos.
- Organize: Categorize photos into folders for easy access.
- Download: Use the “Select All” feature to download multiple photos at once on your PC.
Troubleshooting Tips:
- Internet Speed: Ensure you have a fast internet connection for efficient uploads and downloads.
- Space Management: Regularly clean up your Dropbox to manage storage effectively.
- Sync Problems: Check for updates to the Dropbox app if you experience syncing issues.
iCloud (for iPhone users):
- Upload Photos to iCloud: On your iPhone, go to “Settings” > [Your Name] > “iCloud” > “Photos” and ensure “iCloud Photos” is enabled.
- Access iCloud on PC: On your PC, go to iCloud.com, log in, and download your photos.
Detailed Steps:
- Upload: Ensure “iCloud Photos” is enabled to automatically upload your photos to iCloud.
- Organization: Use folders to organize photos for easy retrieval.
- Download: Use iCloud.com or the iCloud app on your PC to access and download photos.
Troubleshooting Tips:
- iCloud Storage: Monitor your iCloud storage to ensure you have enough space.
- Photo Quality: Ensure iCloud settings are set to download photos in original quality.
- Sync Settings: Check iCloud sync settings if photos are not appearing on your PC.
3. Using Email
Email is a simple method for transferring a small number of photos. Here’s how to do it:
- Compose an Email: On your phone, open your email client and compose a new email.
- Attach Photos: Attach the photos you want to transfer to the email.
- Send Email to Yourself: Send the email to your own email address.
- Access Email on PC: Open the email on your PC and download the attached photos.
Detailed Steps:
- Attachment Size: Ensure your email provider allows the attachment size of your photos.
- Multiple Emails: For larger batches of photos, you may need to send multiple emails.
- Organization: Label emails or use subject lines to keep track of different batches of photos.
Troubleshooting Tips:
- Attachment Limits: Check your email provider’s attachment size limit.
- Download Issues: If attachments won’t download, try using a different email app.
- Spam Folder: Ensure the email doesn’t end up in your spam or junk folder.
4. Using Bluetooth
If your phone and PC both support Bluetooth, you can use it to transfer photos wirelessly.
For Android Phones:
- Enable Bluetooth on Both Devices: Turn on Bluetooth on your phone and PC.
- Pair the Devices: On your PC, go to Bluetooth settings and pair it with your phone.
- Send Photos: On your phone, select the photos you want to transfer, tap “Share,” and choose “Bluetooth.” Select your PC as the destination.
- Accept the Transfer: On your PC, accept the incoming file transfer request.
Detailed Steps:
- Enable Discoverability: Make sure both devices are discoverable.
- Pairing Code: Confirm the pairing code on both devices to establish a secure connection.
- Transfer Confirmation: Accept the transfer request on your PC to start the file transfer.
Troubleshooting Tips:
- Connection Issues: Ensure devices are within close range for a stable connection.
- Interference: Minimize interference from other Bluetooth devices.
- Restart Devices: Restart both devices if the Bluetooth connection fails.
For iPhones:
Bluetooth transfer is not typically supported for iPhones. Use other methods like iCloud, email, or third-party apps.
5. Using Third-Party Apps
There are numerous third-party apps available that facilitate the transfer of photos between your phone and PC. Some popular options include AirDroid, SHAREit, and Xender.
AirDroid:
- Install AirDroid: Download and install AirDroid on both your phone and PC.
- Create an Account: Sign up for an AirDroid account and log in on both devices.
- Transfer Photos: Use AirDroid to transfer photos wirelessly between your phone and PC.
Detailed Steps:
- Setup: Complete the setup process on both devices.
- Connection: Use the same Wi-Fi network for faster transfer speeds.
- Transfer Interface: Use the AirDroid interface to select and transfer photos.
Troubleshooting Tips:
- Network Stability: Ensure a stable Wi-Fi connection for uninterrupted transfers.
- App Permissions: Grant necessary permissions for AirDroid to access photos.
- Compatibility: Check compatibility if using older devices.
SHAREit:
- Install SHAREit: Download and install SHAREit on both your phone and PC.
- Connect Devices: Open SHAREit on both devices and connect them using the app.
- Transfer Photos: Select the photos you want to transfer and send them using SHAREit.
Detailed Steps:
- Connection Setup: Use the QR code or manual setup to connect devices.
- File Selection: Select multiple photos for batch transfer.
- Transfer Speed: Enjoy fast transfer speeds due to direct device-to-device connection.
Troubleshooting Tips:
- App Updates: Ensure both devices have the latest version of SHAREit.
- Connection Issues: Reconnect devices if the connection drops.
- File Format: Ensure photos are in a supported format for transfer.
Xender:
- Install Xender: Download and install Xender on both your phone and PC.
- Connect Devices: Open Xender on both devices and establish a connection.
- Transfer Photos: Select and transfer photos from your phone to your PC.
Detailed Steps:
- Connection Methods: Use QR code or create a hotspot for connecting devices.
- File Selection: Use Xender’s interface to select and transfer multiple photos.
- Speed and Efficiency: Benefit from high-speed transfers with minimal setup.
Troubleshooting Tips:
- Network Connection: Ensure both devices are on the same network or use a hotspot.
- App Permissions: Grant necessary permissions for Xender to access your photos.
- Compatibility: Verify compatibility with your device’s operating system.
Additional Tips for Transferring Photos
- Organize Your Photos: Before transferring, organize your photos into folders to make it easier to find them on your PC.
- Check Storage Space: Ensure your PC has enough storage space to accommodate the transferred photos.
- Maintain Quality: Choose a transfer method that maintains the original quality of your photos.
- Use Reliable Apps: When using third-party apps, choose reputable ones to avoid security risks.
- Backup: Always keep a backup of your photos in case something goes wrong during the transfer process.
- Regular Transfers: Make a habit of transferring photos regularly to keep your PC’s photo library up to date.
- Security: Use secure transfer methods and apps to protect your data.
Conclusion
Transferring photos from your phone to your PC is a straightforward process, with multiple methods available to suit different needs and preferences. Whether you prefer using a USB cable, cloud services, email, Bluetooth, or third-party apps, each method offers a reliable way to get your photos onto your PC. By following the steps outlined in this guide, you can easily transfer your photos and enjoy them on your larger screen anytime, anywhere.